How to Create an Amazon FBA Shipping Plan in 8 Easy Steps
Here's how to create an Amazon FBA shipping plan step-by-step, how much it costs, and how to optimize your shipment to improve your customer experience.
DOWNLOAD TEMPLATEAmazon FBA (Fulfillment by Amazon) is an incredible opportunity for entrepreneurs to get their products into the hands of customers quickly and efficiently.
FBA gives you access to Amazon’s massive Prime customer base and allows you to leverage their global customer service network. Amazon FBA handles the shipping of your products and manages the bulk of customer service, including refunds and return processing.
Setting up an Amazon FBA Warehouse shipping plan is a must for any business that wants to make the most of this service. But the process can be daunting, and many entrepreneurs, Amazon experts and Amazon agencies don't know where to start.
This comprehensive step-by-step guide will provide you with all the information you need to create an effective and efficient FBA shipping plan from your Amazon seller account. You can use this plan for all the various marketing channels you have (even if you sell on your own eCommerce store).
By the end, you'll have a better understanding of the process and the critical steps you need to take to ensure your FBA products are delivered timely and efficiently.
Step 1: Select inventory to be shipped
Before you can create a shipment on Amazon, you will need to select inventory to ship, so you will need to click the add your product button in the catalog menu to create a new listing.
While the product listing doesn’t need to be complete to create a shipping plan, it will need to be added to your Amazon Seller Central account and set to Fulfillment by Amazon (FBA).
[Banner][Looking for an Amazon Expert?][Find them on Mayple. Hand-picked marketers with proven experience, hire in 72 hours.][Get Started][https://www.mayple.com/welcome-v4/?utm_content=blog-banner-amazon-fba-shipping-plan][orange]
Depending on what you selected at the time of adding a product, it may currently be set to Fulfillment by Merchant. To ensure you have the correct setting, check the boxes of the product/s to be shipped, and above the list of items, click the Action on Selected button.
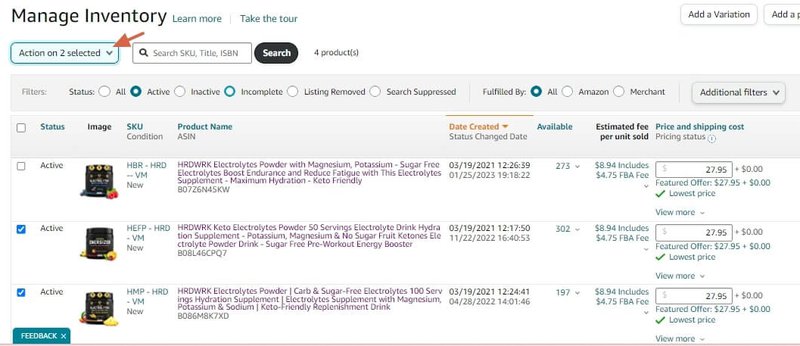
Using the drop-down menu, select Change to fulfilled by Amazon.
Once your listing has been created, you are ready to ship to Amazon. From your dashboard in Amazon Seller Central, navigate to Inventory > Manage Inventory.

Next, you have the option of sending individual products or multiple SKUs. Simply check the boxes on the left-hand side to select the products destined for FBA. Navigate to the Action on Selected button and in the drop-down menu select send/replenish inventory.
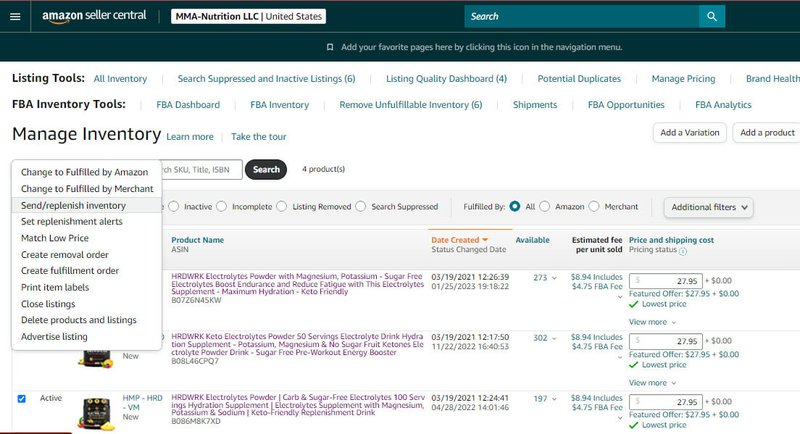
You will be prompted to confirm. Double-check your selected products, then click “Yes, continue”.

Step 2: Select pickup location
Having selected the inventory items to be shipped, the next step is to input the ship-from address. This is the physical location from which your shipment will be collected.

It may be your home or residential address, a business address, your freight forwarder, or a supplier’s warehouse. By default, the most recent shipping address will be applied, so in the instance, you need to select or add an alternative address, click ship from another address.

Step 3: Add your prep and labeling details
The following are critical steps in the shipping process. This is where you need to input the relevant shipping details that Amazon requires including:
- Packing details
- Prep and labeling requirements
- The quantity you plan to send

To enter the packing type you have two options - individual units or creating a new packing template. Packing individual items is recommended for one-off shipments or when shipping multiple SKUs in the same package.
If you plan to ship identical case-packed products each time you create a new shipping plan, it is worthwhile creating a packing template that you can refer to later for future shipments.
If you’re creating a new template, then provide the details, including dimensions, of your package in all fields and click save.
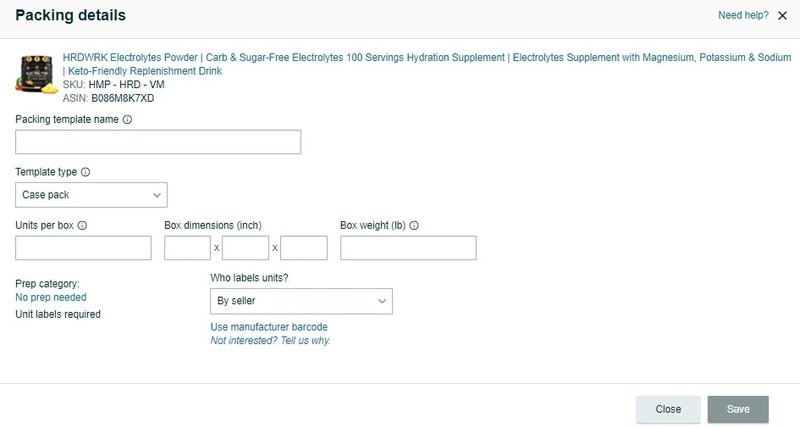
Unless your product is in a restricted category, there are no prep requirements, and you can proceed to select no prep required. If your product does fall under a restricted product category, select the category, and Amazon will provide the additional packaging details you will need for proper preparation before sending inventory.
For example, fragile products such as glass will need additional preparations, and you will be required to bubble wrap all individual items.

When it comes to labeling your products, Amazon has different barcode label requirements for different products. If you sell private label products, all you need is a UPC, or a manufacturer barcode, printed on your product, label, or packaging. In most instances, this will suffice.
For select product categories, you will need an Amazon-Generated Barcode, known as an FNSKU label, to be placed over the merchant barcode for every single product.
Similarly, for arbitrage or wholesale Amazon vendors, an FNSKU label will be necessary to distinguish your FBA inventory from other sellers supplying identical products. In most cases, Amazon will suggest when an FNSKU label is required.
FNSKU labels can be printed within Seller Central and applied yourself, or for a small fee, Amazon can print and label for you. If you are using the UPC barcode option or printing the FNSKU labels yourself, you can select labeling by seller.
Step 4: Identity how many units are to be shipped
Once you have provided the prep and label details, you can enter the number of units or cartons for shipment. Some products may require you to provide an expiration date, such as topical or ingestible products.
If you are sending individual units, proceed to enter the number of units and click Ready to pack.

For case-packed products, enter the number of boxes per shipment and Amazon will calculate the units per shipping box based on the information you provided when you created the packing template.

Now that you’ve provided all the relevant information for your shipping plan details, you can click confirm and proceed to the next step.
Step 5: Send to Amazon
If you have selected individual units, you will be required to fulfill an additional step to confirm if you will be sending in one or multiple packages.
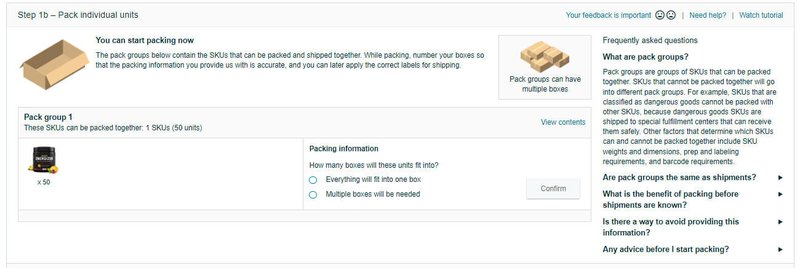
You will then be prompted to provide the package dimensions.

When you click confirm and continue, Amazon will then validate your SKUs, calculate shipping fees, and apply the fulfillment center shipping destinations.
Step 6: Confirm shipping
At this point, you have provided Amazon with all the details they require, from the SKUs to the quantity and packaging specifications. In this step, you will confirm details regarding the logistics of your shipment.
You begin by entering your shipping date. This is the date your shipment will be picked up from the address you supplied in Step 2. If you do not know the exact collection date, provide an estimate.
The shipping service you select will depend on how your items are packed. For most Amazon sellers, this would be Small Parcel Delivery (SPD).
Professional sellers sending larger shipments may opt for the Less than Truckload or the LTL option. This refers to cases or boxes that have been stacked on pallets and will require specific pallet labels.

Step 7: Review and confirm
Before clicking the Accept charges and confirm, be sure to do one final review of your shipment, and your shipping fees and select your freight carrier.
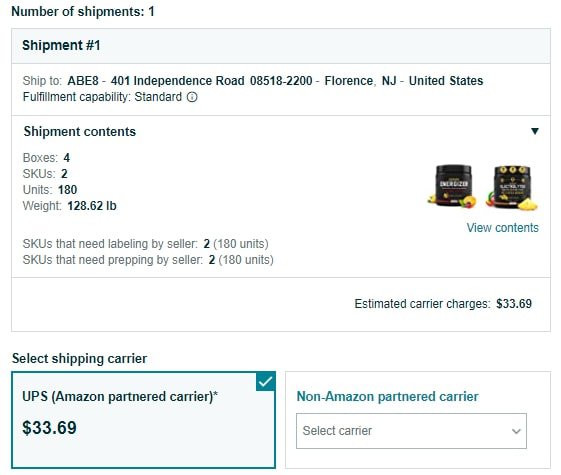
If you choose to select UPS, Amazon-partnered Carrier, the shipping costs will be provided.
If your cartons are being sent directly from your supplier, through a freight forwarder or third-party logistics company, or if you would prefer to organize your own collection, select a non-partnered carrier and use the drop-down menu to select your carrier.
Once your shipping plan is complete, you will need to provide your tracking IDs. You have to accept the charges in order to proceed to print your shipping labels.
One thing to note, when using an Amazon-partnered carrier, you have up to 24 hours to cancel your plan and void all shipping costs.

Step 8: Print your labels
The final step is to print your carton labels and attach them to your packages, to get them ready for collection.
Once you have accepted the charges and confirmed shipping, you will be prompted to select print box labels. Selecting your desired print option from the drop-down menu will open up your labels in a new tab, ready to be printed.
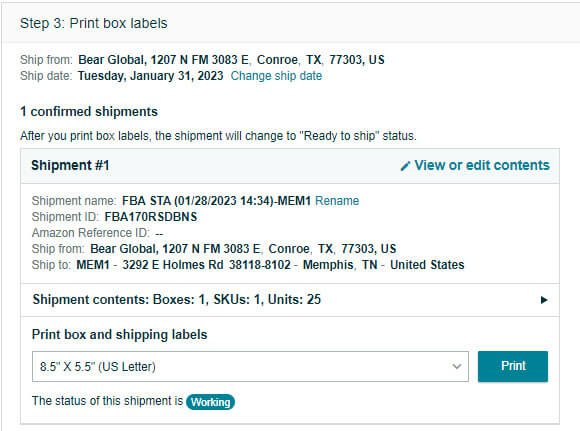
If you are shipping using an Amazon-partnered carrier, your label will include the courier consignment. If you selected a non-partnered carrier, this will need to be obtained and applied to each package.
To meet Amazon requirements and ensure you have a speedy shipment, follow the prompt to continue to the shipping queue and proceed to enter your shipment IDs.
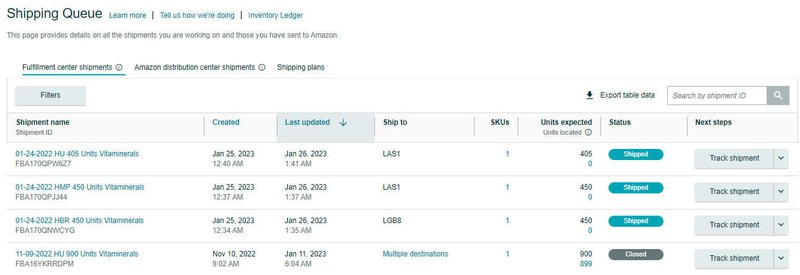
Remember to check your shipping queue regularly for updates and the status of your shipment.
Need help managing your Amazon FBA? Hire one of our top-notch Amazon FBA experts.
What if my shipment gets assigned to more than one FBA warehouse?
By default, you may find that your shipping plan is split into multiple shipments, across multiple fulfillment centers. The fulfillment centers allocated to your shipment are dependent upon the products you are shipping and where you are shipping them from.
While this may incur a higher cost of shipping, this is in your best interest to ensure delivery to your customers meets Amazon Prime Free Two-Day Shipping.
If this is the case, you will need to ensure each carton has the correct FBA label so that each product is delivered to the assigned FBA warehouse.
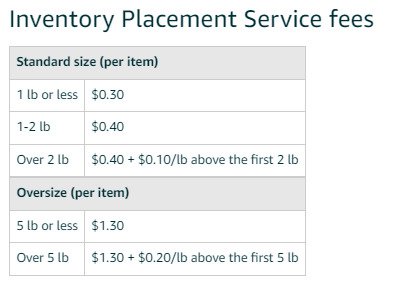
How Much Are Inventory Placement Service Fees?
If you are opposed to multi-fulfillment center shipments, you do have another option. You can sign up for the Amazon Inventory Placement Service which lets you send your inventory to a single fulfillment center or receiving center where it will be split up and distributed to different fulfillment centers on your behalf.
However, some categories, restricted products, and oversized items are exempt from utilizing the service. The destination of receiving or fulfillment center is still determined by Amazon and a per-item fee applies.
Should I choose small parcel delivery (SPD) or less than truckload (LTL)?
If you are a small to medium seller on Amazon and generally ship standard items in single cartons or boxes of individually packaged products, the Small Parcel Delivery (SPD) shipping method is ideal. SPD shipments are typically sent through UPS, Amazon’s partnered carrier, or an alternate carrier of your choice.
While the Less Than Truckload (LTL) method is also available as part of Amazon’s partnered carrier program, it is generally used by advanced sellers for large volume, pallet shipments with oversized items or items that weigh at least 150 pounds. To be eligible for LTL you must have a dock and forklift to enable the loading of pallet shipments.
[Banner][Looking for an Amazon Expert?][Find them on Mayple. Hand-picked marketers with proven experience, hire in 72 hours.][Get Started][https://www.mayple.com/welcome-v4/?utm_content=blog-banner-amazon-fba-shipping-plan][blue]


